Testing new systems is necessary before deployment, but maintaining the hardware to do so is often impractical. Fortunately, virtual systems are available to build test environments. This article describes building Oracle VirtualBox systems on Ubuntu 13.04 desktop. Ultimately, there will be a four-office network connected by routers. There will be web, e-mail and database services, a backup and a systems monitoring strategy. However, the basics come first, and that requires a brief review of installing operating systems.
The Host laptop for this testing environment:
- Four-core, 2.6 GHz Intel i5 processor
- 6 GB RAM
- 500GB SATA Hard Disk with 6GB swap space
- Ubuntu 13.04 Desktop
- Lubuntu Desktop (an Ubuntu XFCE configuration)
- Oracle VirtualBox 4.2.10_Ubuntu r84101
First, start the VirtualBox management application from the desktop.

The host laptop will act as the central point through which all traffic is routed to the Internet. From "File > Preferences", configure three Host Only network adapters:
- Interface vobxnet0: Address 10.0.0.1, Netmask 255.255.255.0 (connected to the eventual Philadelphia router)
- Interface vobxnet0: Address 10.100.0.1, Netmask 255.255.255.0 (acting as a router loopback address)
- Interface vobxnet0: Address 10.0.0.1, Netmask 255.255.255.0 (connected to the eventual Pittsburgh router)

The virtual media -- hard disks -- may also be managed through "File > Virtual Media Manager."

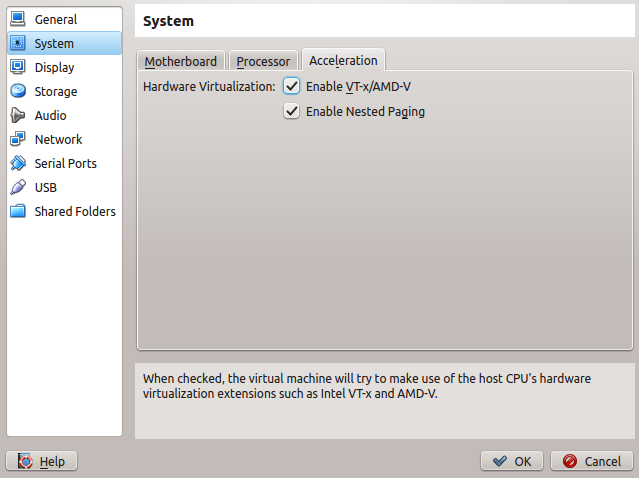
The Settings icon opens a dialog that provides detailed configuration of the virtual hardware. A previously configured monitoring server -- requiring web, database and e-mail servers -- is depicted below.

The motherboard resources are available from the System icon. The monitoring server consists of 512 MB main memory, two processors and hardware acceleration.


The disk subsystem consists of a Serial ATA controller for the DVD drive and a serial SCSI controller for the hard disk.

Switching to a previously configured router, the network interfaces consist of a Host-only adapter and three Internal Network adapters. The Host-only adapter option connects to virtual network adapters configured above on the host laptop. Internal Network adapters run on a virtual switched environment, each switch identified by a unique name. Each virtual switched network acts as a single broadcast domain, isolating the virtual machines from not only hosts on other virtual switches, but also from the host operating system. Thus, routers are needed to connect virtual switches to one another. This router is configured to connect to one Host-only Network (the host laptop's operating system through network vboxnet2) and three virtual Internal Networks:
- PHL-PIT - the WAN link between Philadelphia and Pittsburgh
- PIT-HBG - the WAN link between Harrisburg and Pittsburgh
- PIT - the Pittsburgh Office private network
Oracle provides a detailed description of the networking options.


The above information defines the networking required to build a SAN server on the Pittsburgh private network (VirtualBox adapter 4, OS adapter eth3, 10.202.0.0/24). The following illustrations depict setting up the hardware for the server.
First, name the machine and specify the operating system -- in this case 64-bit Debian Linux.
First, name the machine and specify the operating system -- in this case 64-bit Debian Linux.

Specify the installed main memory.

Define a virtual hard disk. By default, VirtualBox will assign a dynamically-sized disk that grows as needed up to the specified size. However, there is a small performance penalty compared to a fixed virtual disk in which all disk space is allocated upon creation. Since there will be many hosts operating simultaneously, select a Fixed Size virtual disk.


The machine is ready to boot after the hard disk is created, however it is not configured for the test network and selected operating system. VirtualBox creates an IDE controller for the DVD device and a Serial ATA device for the hard disk. Debian Linux suffers a significant performance penalty for ATA and SATA hard disks on VirtualBox -- despite the host laptops SATA architecture. Remove the Virtual Controllers (NOT the disks), add a SATA controller for the DVD and a SAS controller for the hard disk. VirtualBox will prompt you to create a new hard disk or select an existing one; use the existing hard disk that is in the directory VirtualBox created for the new server.


By default, VirtualBox creates one network adapter that attaches to the host network adapter by Network Address Translation. Thus, we need to change the network adapters for the SAN Server to four devices (Intel Pro 1000/MT Desktop Adapters) connected to the PIT switch for the Pittsburgh private network.


Once the network adapters are configured, go to Storage and add the bootable Debian Wheezy DVD .iso as the DVD on the SATA controller.

Power on the virtual machine and install just as you would on hardware.


Once the machine is installed, there are some minor adjustments to prepare it for deployment to the test environment. Debian configures only one network adapter during installation, so edit the /etc/network/interfaces file to add the additional adapters and then restart networking with the two commands "service networking stop" and "service networking start" ("service networking restart" is unreliable under Debian Wheezy; use the two commands to assure networking restarts correctly).


Modify the /etc/apt/sources.list file to add the "wheezy", "wheezy-updates" and "wheezy-backports" "main" and "contrib" mirrors of your choice. We will install webmin -- the web-based system configuration package. Add the webmin and somersettechsolutions sites as well, and then fetch the key from webmin and add it to the the apt keys.


Next, update the repository list with "apt-get update." this will add the sources we need to install applications required for the test environment.

The applications we need can be downloaded and installed using apt-get install. snmp and snmpd are the Simple Network Monitoring Protocol packages. The SAN will provide network storage services with iscsitarget. Webmin is a management package. Nagios, Xymon, Munin and Zabbix are network and host monitoring applications that will be discussed in a later article.


Notice while installing there are 20 packages listed that may be upgraded (patched). Updates will be applied later.
While installing, Xymon will prompt for the address of a monitoring server. If this is installed already -- or if its address has been previously planned -- enter it. The configuration file may be changed later, so it is not critical to assign it at this time.
Upon completion, the system is ready to configure. Below are a sample Webmin Main and iSCSI Target configuration screens. These,too, will be discussed in a later article.


Upon installing all required packages, install all available updates with the command "apt-get dist-upgrade." Reboot if kernel updates are installed.
The host is installed and ready to deploy for final configuration. The tasks to build the network are the subjects of future articles.
No comments :
Post a Comment