Optimizing and testing Linux Layer 2 and Layer 3 host networking tun/tap, bridge and routing options for host-to-VM and VM-to-VM connectivity for QEMU/KVM, VirtualBox and GNS3. Includes performance tests for QEMU/KVM networking options that indicate 12.0 Gb/s to 18.8 Gb/sec sustained throughput for Linux host switching and routing.

Introduction
Linux distributions -- through the kernel and additional packages -- includes support for a variety of Layer 2 and Layer 3 networking features. At Layer 2, it supports bridges, switching and VLANs. At Layer 3, it supports IP routing and routing protocols such as RIP, OSPF, EIGRP, etc. This article illustrates configuring various Linux host networking features to provide connectivity between GNS3 and QEMU/KVM networks.The current Linux networking toolkit is iproute2 -- replacing older net-tools (ifconfig, ARP, etc.) and other (bridge-utils, tunctl, vlan, etc.) with one package. However, some of the features in the older tools are still useful and will be installed.
The host laptop has quad-core Core i5 3230M, 2.60 GHz processors and 6 GB memory. The QEMU/KVM VMs used for testing were assigned 4 cores each and 2 GB memory.
Linux Layer 2 Features
Layer 2 of the OSI model -- the Data Link Layer -- provides a variety of lower-level services. Frames use Media Access Control (MAC) addresses to identify the source and destination addresses on a single Local Area Network. MAC addresses are hard-coded into network interfaces (although they may be changed is the operating system supports that) and unique. Destination addresses are discovered with broadcasts (and ARP) that flood the LAN; a single LAN is a broadcast domain. Switching and bridging refers to transmitting frames from source to destination based upon MAC addresses. Traditionally, a bridge has two interfaces and a switch more than two. Thus, Layer two only operates on LANs and requires higher-level networking to transmit between LANs.Linux Layer 2 Switching and Bridging
The current iproute2 toolkit may be used to create bridged interfaces. However, there is additional functionality on the older bridge-utils toolkit that also integrates more easily with the Debian-style /etc/network/interfaces configuration file.Linux tun and tap Devices
These are pseudo devices created in software and not physical ones. At Layer 3, tun devices work at the packet level and typically used for tunnelling protocols. For switching, tap devices operates at the Data Link layer and simulate a single interface.You may use the older bridge-utils tunctl command or newer iproute2 command to create tap devices:
tunctl -t tap0or
ip tuntap add tap0 mode tapYou may also create these devices at boot time using the Debian-style /etc/network/interfaces file:
auto tap0The devices may also be configured with IP addresses by specifying "iface tap0 inet static" and the address, netmask and (optionally) gateway.
iface tap0 inet manual
pre-up tunctl -t tap0or
pre-up ip tuntap add tap0 mode tap
Linux Bridges and Switches
Bridges and switches -- multiport bridges -- are also available. For the balance of this section, I will refer to both bridges and switches as bridges. They are quite flexible in that you do not have to define specific ports as members or even a total number of logical ports in a bridge. The newer iproute2 toolkit supports creating bridges, however the older bridge-utils package is (in the author's opinion) easier to use and provides more granular control of bridge configuration. From the brctl help command:- addbr <bridge> add bridge
- delbr <bridge> delete bridge
- addif <bridge> <device> add interface to bridge
- delif <bridge> <device> delete interface from bridge
- hairpin <bridge> <port> {on|off} turn hairpin on/off
- setageing <bridge> <time> set ageing time
- setbridgeprio <bridge> <prio> set bridge priority
- setfd <bridge> <time> set bridge forward delay
- sethello <bridge> <time> set hello time
- setmaxage <bridge> <time> set max message age
- setpathcost <bridge> <port> <cost> set path cost
- setportprio <bridge> <port> <prio> set port priority
- show [ <bridge> ] show a list of bridges
- showmacs <bridge> show a list of mac addrs
- showstp <bridge> show bridge stp info
- stp <bridge> {on|off} turn stp on/off
auto br0These specify a bridge with an address and netmask (but no gateway) with a single defined interface -- tap0. Spanning Tree Protocol -- to identify and prevent bridge loops -- is enabled and there is no forwarding delay when the bridge becomes active. More interfaces may be added to the bridge using virtual networking -- such as GNS3 and QEMU/KVM, but more on that later.
iface br0 inet static
address 172.31.254.1
netmask 255.255.255.0
bridge_stp on
bridge_fd 0
bridge_ports tap0
It is not necessary to use tap interfaces with numbered, empty bridges. Some virtualization technologies, such as VirtualBox, refer to this as Host-Only Networking because the VMs can communicate with each other and the host, but not outside networks. Simply omit the bridge_ports definition:
auto br0In the above case, tap0 is the operating system's logical interface connection to the bridge. It does not have to be numbered as the OS will recognize the bridge itself as having the assigned IP address. You are not limited to adding host tap interfaces to the bridge and physical Ethernet devices may be added as well. Wireless interfaces may also be added, but require additional configuration that will not be addressed in this article.
iface br0 inet static
address 172.31.254.1
netmask 255.255.255.0
bridge_stp on
bridge_fd 0
Layer 2 Host Networking Performance
bandwidth is an important consideration and there is a lot of misinformation about Linux tun and tap performance scattered around the Internet -- further proving the satirical adage "I read it on the Internet, it must be true!" The author's limited searches suggested tap interfaces "theoretically" perform at up to 160 Mb/s, but in reality perform at under 10 Mb/s (less than a 20-year-old Ethernet NIC).The following output is from a 60-second iperf test between the host (Ubuntu 14.04 Desktop) and a QEMU/KVM virtual machine (Debian Wheezy) over a tap/bridge connection:
~$ iperf -c 172.31.253.2 -t 60 -i 10The following output is from a 60-second iperf test between the host (Ubuntu 14.04 Desktop) and a QEMU/KVM virtual machine (Debian Wheezy) over a bridge (no tap interface) connection:
------------------------------------------------------------
Client connecting to 172.31.253.2, TCP port 5001
TCP window size: 136 KByte (default)
------------------------------------------------------------
[ 3] local 172.31.253.1 port 50211 connected with 172.31.253.2 port 5001
[ ID] Interval Transfer Bandwidth
[ 3] 0.0-10.0 sec 21.7 GBytes 18.7 Gbits/sec
[ 3] 10.0-20.0 sec 22.5 GBytes 19.3 Gbits/sec
[ 3] 20.0-30.0 sec 21.8 GBytes 18.7 Gbits/sec
[ 3] 30.0-40.0 sec 21.3 GBytes 18.3 Gbits/sec
[ 3] 40.0-50.0 sec 21.9 GBytes 18.8 Gbits/sec
[ 3] 0.0-60.0 sec 131 GBytes 18.8 Gbits/sec
~$ iperf -c 172.31.254.3 -t 60 -i 10
------------------------------------------------------------
Client connecting to 172.31.254.3, TCP port 5001
TCP window size: 85.0 KByte (default)
------------------------------------------------------------
[ 3] local 172.31.254.1 port 34266 connected with 172.31.254.3 port 5001
[ ID] Interval Transfer Bandwidth
[ 3] 0.0-10.0 sec 21.6 GBytes 18.5 Gbits/sec
[ 3] 10.0-20.0 sec 20.9 GBytes 18.0 Gbits/sec
[ 3] 20.0-30.0 sec 21.0 GBytes 18.1 Gbits/sec
[ 3] 30.0-40.0 sec 21.6 GBytes 18.6 Gbits/sec
[ 3] 40.0-50.0 sec 21.1 GBytes 18.2 Gbits/sec
[ 3] 50.0-60.0 sec 22.0 GBytes 18.9 Gbits/sec
[ 3] 0.0-60.0 sec 128 GBytes 18.4 Gbits/sec
The following output is from a 60-second iperf test between the two QEMU/KVM virtual machines (Debian Wheezy) over a tap/bridge connection:
~# iperf -c 172.31.253.2 -t 60 -i 10
------------------------------------------------------------
Client connecting to 172.31.253.2, TCP port 5001
TCP window size: 23.5 KByte (default)
------------------------------------------------------------
[ 3] local 172.31.253.3 port 33823 connected with 172.31.253.2 port 5001
[ ID] Interval Transfer Bandwidth
[ 3] 0.0-10.0 sec 14.1 GBytes 12.1 Gbits/sec
[ 3] 10.0-20.0 sec 14.3 GBytes 12.3 Gbits/sec
[ 3] 20.0-30.0 sec 14.5 GBytes 12.4 Gbits/sec
[ 3] 30.0-40.0 sec 14.3 GBytes 12.3 Gbits/sec
[ 3] 40.0-50.0 sec 14.2 GBytes 12.2 Gbits/sec
[ 3] 0.0-60.0 sec 84.1 GBytes 12.0 Gbits/sec
The following output is from a 60-second iperf test between the two QEMU/KVM virtual machines (Debian Wheezy) over a bridge (no tap interface) connection:
~# iperf -c 172.31.254.2 -t 60 -i 10
------------------------------------------------------------
Client connecting to 172.31.254.2, TCP port 5001
TCP window size: 23.5 KByte (default)
------------------------------------------------------------
[ 3] local 172.31.254.3 port 59334 connected with 172.31.254.2 port 5001
[ ID] Interval Transfer Bandwidth
[ 3] 0.0-10.0 sec 16.0 GBytes 13.7 Gbits/sec
[ 3] 10.0-20.0 sec 16.1 GBytes 13.8 Gbits/sec
[ 3] 20.0-30.0 sec 16.1 GBytes 13.8 Gbits/sec
[ 3] 30.0-40.0 sec 15.8 GBytes 13.5 Gbits/sec
[ 3] 40.0-50.0 sec 15.4 GBytes 13.2 Gbits/sec
[ 3] 0.0-60.0 sec 95.0 GBytes 13.6 Gbits/sec
Properly configured, Layer 2 networking performance between Linux hosts and VMs is excellent. Bandwidth between VMs is less than between host and VM; a 13.3% performance improvement was realized by using bridges without a host tap interface.
Adding Virtual Machine Interfaces to Linux Layer 2 Devices
QEMU/KVM

Using the Qemu/KVM Virtual Machine Manager is the easiest way to connect to host machine networks. Virtual Machine Manager automatically recognizes configured host tap/bridge devices and offers to bridge its own virtual NICs to a tap interface.


VirtualBox
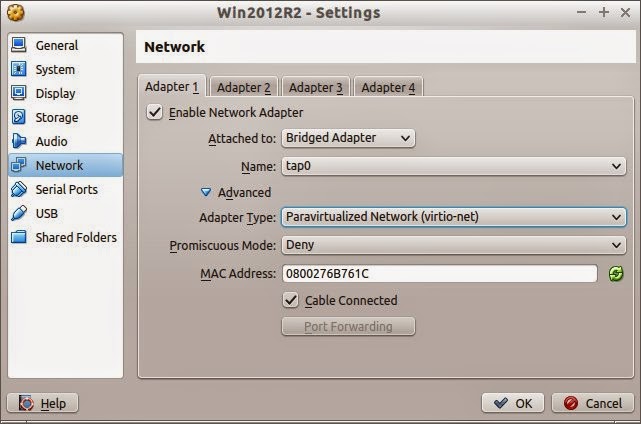
The selections for VirtualBox guests are much the same as for QEMU/KVM guests. Under Network, select "Bridged Adapter" and "tap0" (or another tap interface if so desired). Open the Advanced settings and select the Paravirtualized Network (virtio-net).
GNS3
GNS3 connections to the host are more detailed and have been described in another post.Linux Layer 3 Routing
The Linux kernel supports static Layer 3 IP routing. However, virtualized environments (particularly using GNS3) are better served by routing protocols. This article describes how to implement a relatively portable OSPF configuration that, with minimal configuration, connects virtual machines and networks to the Internet.Quagga Routing Protocols
Quagga is a fork of the inactive Zebra project. For the subject host, it will implement OSPF to route between the host, Internet and virtual networks. A previous post discusses the topic in detail.For this implementation, the backbone area (range 172.16.0.0/12) will be the host Linux laptop itself. The wireless network's DHCP network and tap/bridge interfaces will be areas attached to the backbone.
Layer 3 VM Networking Performance
Layer 3 routing between networks typically involves additional overhead and resulting lower speeds than Layer 2 switching. Under Linux host networking using two different numbered bridges (without tap interfaces), there appears to be a small degree of such reduced performance, albeit quite small.~# iperf -c 172.31.254.2 -t 60 -i 10
------------------------------------------------------------
Client connecting to 172.31.254.2, TCP port 5001
TCP window size: 23.5 KByte (default)
------------------------------------------------------------
[ 3] local 172.31.253.3 port 57056 connected with 172.31.254.2 port 5001
[ ID] Interval Transfer Bandwidth
[ 3] 0.0-10.0 sec 15.3 GBytes 13.2 Gbits/sec
[ 3] 10.0-20.0 sec 15.2 GBytes 13.1 Gbits/sec
[ 3] 20.0-30.0 sec 15.4 GBytes 13.2 Gbits/sec
[ 3] 30.0-40.0 sec 15.3 GBytes 13.1 Gbits/sec
[ 3] 40.0-50.0 sec 14.6 GBytes 12.6 Gbits/sec
[ 3] 50.0-60.0 sec 14.4 GBytes 12.4 Gbits/sec
[ 3] 0.0-60.0 sec 90.2 GBytes 12.9 Gbits/sec

Host Wireless Adapter
The author uses many wireless networks and they are (fortunately) all configured to assign DHCP addresses in the 192.168.x.x range, although on a variety of different 24-bit CIDR masks. They also assign a static default gateway. While it is possible to add a wireless adapter to a bridge, it is easier to configure OSPF to treat the wireless adapter as a non-backbone area. The following Quagga commands (note the slightly different from Cisco syntax) cover the range of 162.168.x.x addresses to operate correctly under OSPF:network 192.168.0.0/24 area 192.168.0.0Please note that a separate network definition must be applied for each different subnet the wireless LAN interface encounters. This requires adding only one command to the Quagga ospfd.conf file each time a new network is encountered.
network 192.168.1.0/24 area 192.168.0.0
...
area 192.168.0.0 range 192.168.0.0/16
default-information originate always
Since wireless routers assign a static route to the Linux laptop host, it acts as the default gateway originator (OSPF command "default gateway originate always"). This configuration passes the static default gateway from the backbone to connected OSPF areas -- the virtual networks.
Host tap/bridge Interfaces
The numbered host tap/bridge interfaces may be added to the Quagga routing protocols. For OSPF, assure they are numbered in the Area 0.0.0.0 Backbone range and add their networks accordingly. These interfaces will then update the host routing tables and any other connected areas.Guest Interfaces
Three scenarios are depicted in the illustration above:- VMs individually connected to a bridge
- QEMU/KVM or VirtualBox Linux router gateway
- GNS3 Cisco router gateway
VMs individually connected to a bridge
This is a basic scenario. The hosts simply need to connect to the tap or bridge interface, have an address in the same subnet and the gateway defined as the host tap or bridge IP address.QEMU/KVM or VirtualBox Linux router gateway
A VM acting as a gateway to other VMs behind it requires a routing protocol. One interface must be connected to the host tap or bridge interface and any others connected to one or more bridges for the other hosts. These additional bridges may be host bridges (as described in this article) or ones defined in the Virtual Networking software used (e.g. QEMU/KVM, VirtualBox, etc.). Performance of the additional bridges will be the topic of another post.GNS3 Cisco router gateway
GNS3 on an Ubuntu host is a bit more complicated affair. Connecting to host networking requires root access (as depicted in the illustrations below), and this has been problematical for the author.

GNS3 also is a software emulator and when emulating Cisco IOS hardware-based routers, performance suffers. Although this test was conducted using an older version of GNS3 (0.86), the author's anecdotal observations of performance of the current (at the time of writing, 1.2.3) indicates low bandwidth routing performance.
Linux host virtualization networking Capra Host enables virtual machines to communicate via bridged, NAT, or host-only networks, allowing flexible connectivity between VMs, the host, and external networks for efficient resource sharing and isolation.
ReplyDelete